Saturday, January 1, 2011
Friday, November 5, 2010
Auto geocoding photos without a GPS Camera
I like to geocode my photos, since I keep them in Picasa. Pacasa will locate you photo on a Google map if they are geocoded. Many modern camera's have built in GPS, but mine doesn't. I do have an Android cell phone that does. There is a (free) Android Application called "Route Recorder for Photographer" (RRP)that will do all the hard work.
1. Download the app from the Android Market Place.
2. Sync your camera's clock with your cell phone's clock
3. Open "Route Recorder for Photographer" on your cell phone and press "Start"
4. Start taking pictures, all day if you wish, A one gigabyte SD card will hold 45 million way-points.
5. When you are finished taking photos and are ready to transfer them to you computer, remember the file location (folder) you store them in.
6. Open RRP on your phone and "stop" recording way-points. Click "Options" and select "Create photoGPS.exe" (you only have to do this once).
7. Either move the SD card to your computer's card reader or tether you cell phone via USB cable.
8. Copy two file to a know location (I use the Desktop) photoGPS.exe and gpsTrackfile.bin.
9. Goto the "command prompt", put yourself in the directory that contains the two files. In my case Vista put me in c:users\Tom to get to the desktop you need to type "cd \desktop" then you
will be at c:users\Tom\desktop>
10. If you just run the photoGPS.exe file it will show you the syntax required to execute the program.
11. I only use the -t and -p parameters. This is the tricky part, you have to get the syntax right or it won't execute.
This is how my command line looks:
C:\users\Tom\Desktop> photoGPS -t test.bin -p c:\users\tom\pictures\gpstest
The name of the file holding the way-points "gpstrackerfile.bin" is the default. You can change that for each session, but remember the the new .bin filename for this command. In the above example I changed it to "test.bin"
12. The second file is the location you are storing the photos you took for this session. In may case they are folders in the "Pictures" folder. Example c:\users\tom\pictures\gpstest as I named it above
13 If it executes properly you will see a list of files (jpgs) that were updated with GPS coding.
Monday, March 15, 2010
Thursday, March 11, 2010
Transfering a Recipe from the Web to Living Cookbook
First: Open Web Recipe in one window. Then open Living Cookbook in a separate window. Place both window on the task bar. Click on Living Cookbook, select the category the recipe is to be under and select "New Recipe" Click on Capture.
 Place "Living Cookbook on the task bar, and select the Web Recipe Site. (Cook's Illustrated).
 Find the recipe you want, and highlight all the text including the name, Start from the bottom and work up.

Right click on the selected text and select "Copy"
 Place the Web Cook Recipe window on the task bar. Select Living Cookbook.
 Now select "Capture" if you haven't already done so. Right click on the screen and select Paste:
 You now have to assign each part of the recipe to the corresponding category on the right side of the window by highlighting it and then selecting the correct category.
 Click OK and this will bring you to the Recipe window. Go back to the Web Recipe site and right click on the photo of the recipe.
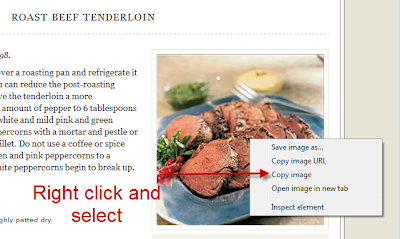 Select "Copy Image" and move to the Living Cookbook and place your cursor in the "Recipe image:" section, right click and select "Paste Image"
 Click OK.
 And You are Finished.


Saturday, March 6, 2010
Sync Your Files With Dropbox
Dropbox www.dropbox.com
Step 1 Download program
This is a specially great program for people that use computers in different places, but need the same data files. I use this when I am on the road away with my RV, but still need to pay bills through my "Quicken" software. This is a desktop and a web application working together. When you download and install this free application, a special folder is created called "My Dropbox". It will be created in you Documents, or My Documents folder depending on the version of Windows you are using.You will then be asked to create a Dropbox account at www.dropbox.com . A two gigabyte account is free. This is usually all you will need. Create the account and watch the video while you are there.
Step 2 Place file in Dropbox
Back on your desktop computer you now need to place those files that you want to use on other computers in the dropbox folder. I will use the Quicken example to demonstrate this. In your Quicken Program, go to File - Open and see where Quicken goes to fine your quicken data. Make a note of the location, by default it is located in the Quicken folder in Documents as shown below.
Now exit Quicken and open "Windows Explorer" (windows key + E) . Go to the directory containing the Quicken data files and copy the ones highlighted in the photo above. Move to the "Dropbox folder and paste them into that folder.
Now go back to Quicken and select File - Open and navigate to the "Dropbox folder and select the "QDF" file if you have a recent version on Quicken. Or one of the other listed file in the type box in the lower portion of the selection area. See photo below.

Step 3 Set up second computer
When you are on your second computer download "Dropbox" www.dropbox.com to that computer. Let it install just as you did with the first computer. When it ask you to set up an account, there will be a check box that ask you if you already have an account. Select "I already have an account" and fill in your user name and password. If you are connected to the internet it will start downloading your Quicken file to the Dropbox folder on that computer and they will be identical to the ones on your first computer.
Now when you open Quicken the first time you will need to go to File -Open and select the Quicken file in the "Dropbox" folder. Again you will only have to do this once, since it will now be the default file and folder.
This can be used with any application program that you have on both computers. Many people use this to keep photos on both computers, they even provide a default folder for photos and music. If you use Microsoft Word or other word processors to keep a journal of your travels, this is a perfect way to always have the most up to date version of you work.
You can also place files, including photos, music files, or any other file in the Public section of the folder and it will give you a link to just that folder that you can share with your friends to pass along file you wish to share. The following will send you to a video that explains how to start you other computer with the newest copy of Quicken
Tuesday, March 2, 2010
Google Reader (52)
Google Reader (52)
This is a great password saving program, it also fills out forums like your address and email address.
Subscribe to:
Posts (Atom)